Git 101
⚠️ Some commands in this document may not run on Windows machines.
Introduction
For every software project, we need a tool to keep our files safe, retain a history of changes, attribute those changes to their authors, and have a seamless collaboration between team members. We also want the tool to be fast and easy to use. Git delivers all that.
A Git project is referred to as a “repository,” which contains the complete history of the project from the beginning. A repository consists of individual snapshots called “commits.” A single commit includes:
The project tree
A structure of nested files and directories representing a complete state of the project:
project
│   README.md
│   file001.txt
│
└───folder1
│   │   file011.txt
│   │   file012.txt
│   │
│   └───subfolder1
│       │   file111.txt
│       │   file112.txt
│       │   ...
│
└───folder2
    │   file021.txt
    │   file022.txt
The “author”
Name, email address, and date/time indicating who made the changes that resulted in this project state and when.
The “committer”
The same information about the person who added this commit to the repository (which may be different from the author).
Note: author and committer will refer to the same person if you’re working on a Git project alone. In group projects, however, they could refer to different people (or even bots!).
A “commit message”
Text used to comment on the changes made by the commit.
The following figure shows a Git project containing one branch (Main) and 4 snapshots (commits).
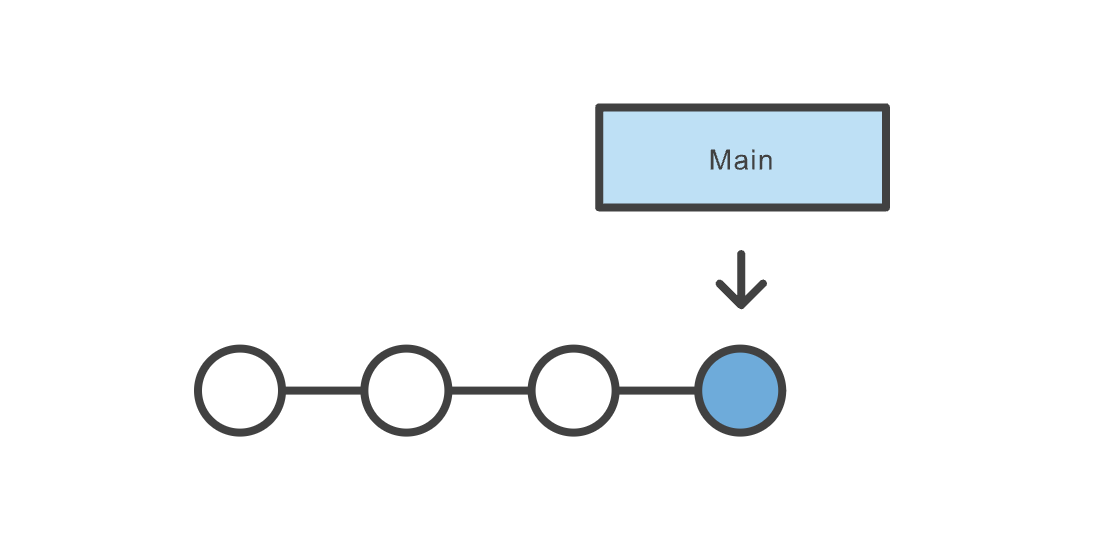
Image Credit: Atlassian
Download and Install Git
First, there’s a chance you already have Git installed on your system. To make sure, open up a Terminal (command-line) and try this command:
git --version
If you see a Git version showing up, you can skip this step. If not, refer to this tutorial on how to install Git based on your operating system.
Turning a Folder Into a Git Project
In order to turn a folder into a Git project, first cd to the folder in your Terminal: cd /your/folder. Then run git init. If successful, the folder is now tracked via Git. You should also be able to see a hidden folder named .git in your root directory: ls -la.
Create Snapshots (commits)
In order to create snapshots in a Git project, you need to first stage your changes, as commits only create snapshots of the changes already staged within a project. To stage a file, run git add <file-name>. You can also use the handy git add -A command to stage everything in the project. To create a snapshot of staged files and folders, use the git commit -m "commit message" command. The commit message could be anything, but it’s highly recommended to put something meaningful, especially if you’re working in a team, as it makes it easier to follow changes later.
Check the Status of a Project
You can use the git status to check the status of a project. Note that you need to be inside the Git project for the command to work. Here’s a sample output of the command:
On branch main
Your branch is up to date with 'origin/main'.

Changes not staged for commit:
  (use "git add <file>..." to update what will be committed)
  (use "git restore <file>..." to discard changes in working directory)
        modified:   git-101/README.md

Untracked files:
  (use "git add <file>..." to include in what will be committed)
        git-101/images/

no changes added to commit (use "git add" and/or "git commit -a")
It tells you which branch you are currently on (main in this case); files not staged yet; and files not being tracked at the moment. To stage a file, or start tracking a file, use the git add <file-name> command.
Branches
When you first turn a directory to a Git project, Git will create a branch named main for you (you can list your branches by using the git branch command). Changes you make (almost) always happen on a branch. A branch is simply a pointer to a commit. That commit in turn can point to a parent commit, then another parent commit, etc.

Image Credit: Atlassian
Branches are very important when working in a team. We create branches (or branch off an existing branch, as they say) to work on a new feature, bug fix, etc. while at the same time not interfering with other teammates’ works on other branches. When finished, we will merge our branch to a main branch. Note that I said a main branch and not the main branch. In a real-world scenario, typically, there are multiple main branches associated with different environments (for instance: dev, staging, and production). A main branch is a branch that once merged into, will usually trigger a deployment process and change the state of an environment.
In order to create a branch, you can use the git branch <branch-name> command. Note that this will not change the current branch for you. You also need to checkout to the branch using the git checkout <branch-name>. There’s also a handy command: git checkout -b <branch-name> which will create the branch and checkout to it in one step.
Remote Repository
Remote repository is a server that holds a central copy of your local repository. A central or remote repository is key to working efficiently in a team, as each team member can pull the latest changes from the central repository and push their changes to it. The following figure shows a central (remote) repository and two collaborators working as a team.

Image Credit: Atlassian
It’s convention to name the remote repository origin. To pull the latest changes from the remote repo, use git pull origin <branch-name>, and to push your changes to the remote repo, use git push origin <branch-name>.
Pull Request
A Pull Request (or PR for short) is request to merge your branch (including your latest changes) to a remote branch. Although you may be able to push directly into a branch without creating a PR first, it’s always recommended to do so when you’re working in a team, as PRs allow collaborators to discuss the changes before merging.
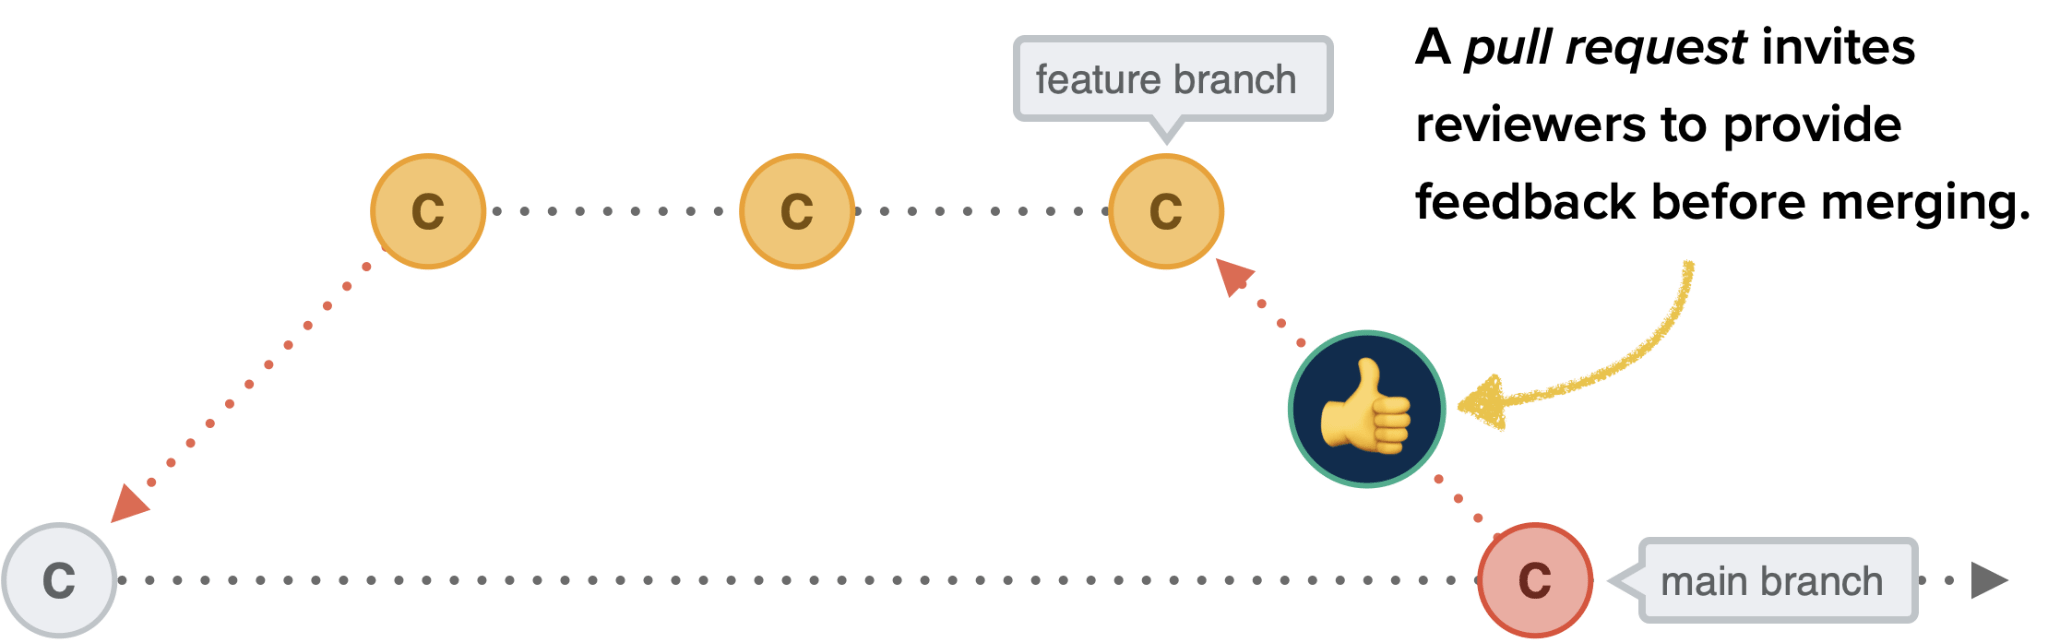
Image Credit: CSS Tricks
Most-used Commands in This Course
# initialize a git repository
git init

# add (stage) all changes
git add -A

# commit staged changes with a message
git commit -m "commit message"

# create a new branch and checkout into it
git checkout -b <branch-name>

# change the current branch to an existing branch
git checkout <branch-name>

# delete a branch
git branch -D <branch-name>

# see commit logs
git log

# see logs in one line
git log --oneline

# see status of the current local repository
git status

# see the list of local branches
git branch

# see the list of both local and remote branches
git branch -a

# rebase a branch with another one
git rebase <branch-name>

# see remote repositories linked to the current local repository
git remote -v

# add a new origin (remote repository)
git remote add origin <origin-url>

# pull the latest changes from the remote repository
git pull origin <branch-name>

# push a branch to the remote repository
git push origin <branch-name>

# cache GitHub credentials
git config --global credential.helper 'cache --timeout=36000'

# remove git cache
git rm -r --cached .

# set upstream (default remote branch) for a local branch
git push -u origin <branch-name>

# revert a commit
git revert <commit-hash>

# config username and email for a git project
git config user.name "username"
git config user.email "email"
Git cheat sheet
The commands discussed above–and more–are summarized in this cheat sheet available to download.