AWS Lambda with Terraform
Overview
Before we begin, let’s briefly talk about the concepts and technologies we’ll be using.
Cloud
You’ve probably heard this before: There’s no cloud; it’s just someone else’s computer. Basically, it’s true, although there’s more to that. But in a nutshell, instead of buying resources–such as CPU, Memory, and Storage–yourself, you rent them from someone else. That someone else is usually a big company. The most popular ones are AWS, Google Cloud, and Azure.

Image Credit: quora.com
AWS
Amazon Web Services (AWS) is the first and biggest cloud provider today with more than 34% of the market. AWS has regions all around the world. You can check the whole map here. It’s always recommended to go with the region closest to your business and users as you would be able to offer the best service (faster response time). Some big organizations, such as Netflix, have multiple regions to offer the best service to their customers.
AWS offers a generous Free Tier for new users for up to 12 months (some services have a free tier forever, not just for 12 months). During this period, you could use a variety (not all!) of services for free, provided you stay below the Free Tier threshold. Some popular services offered by the Free Tier are Lambda, S3, DynamoDB, EC2, and API Gateway. You can create a new account here.
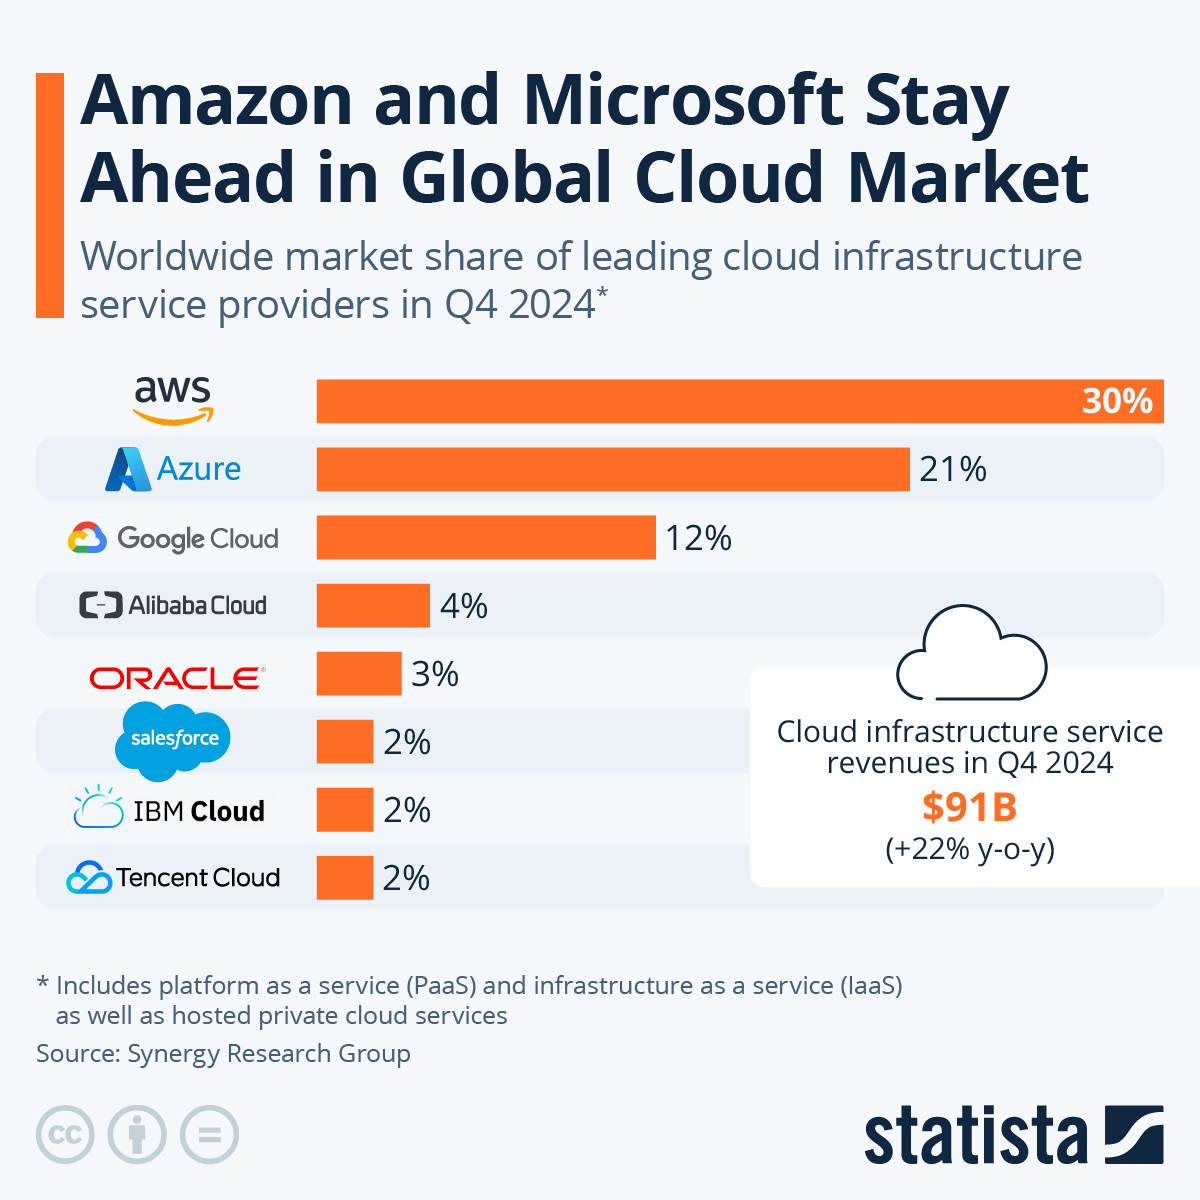
Image Credit: statista.com
S3
Simple Storage Service (S3) is a cloud-based storage offered by AWS. It’s highly available (almost never goes down), scalable (can handle thousands of requests per second), and secure (offers several methods of encryption). You can use S3 to host a data lake (a central location for all your data); host a static website; archive data at a very low cost; and build cloud applications. S3 is the backbone of many services on AWS. One of those services is Lambda–which we’ll be talking about in a bit.
In order to upload a file to S3, we first need a bucket. Buckets are a way of organizing your data on AWS. By default, you can have up to 100 buckets per AWS account. Bucket names must be unique worldwide. You can’t create an S3 bucket with the same name as somebody else’s, even though they’re using a different AWS account.

Image Credit: AWS
CloudWatch
CloudWatch is an AWS service that collects and aggregates logs from other services (such as Lambda) on AWS. Logs are the outputs produced when running code. An example of that is the print method in Python; whatever you print is considered an output, and therefore logs.
Two main concepts in CloudWatch are Log Groups and Log Streams. A log group is a group of log streams that share the same retention period (how long before they get expired and deleted from CloudWatch). In case of Lambda functions, each function is associated with a log group named /aws/lambda/<name-of-the-lambda-function>.
Inside each log group, there are a number of log streams. Each log stream is a sequence of logs that share the same source.
IAM
IAM (or Identity and Access Management) is an AWS service that specifies who or what can access AWS resources. There are a few key concepts when it comes to IAM:
- IAM Identity: an IAM Identity provides access to an AWS account. Anyone or anything that wants to access AWS services, needs an IAM Identity first
- IAM User: an IAM Identity who has specific permissions
- IAM Role: like an IAM User, an IAM Role is also an IAM Identity that has specific permissions. Unlike an IAM User, however, an IAM Role is not uniquely associated with one person. Rather, it can be assumed by anyone or anything that needs it (e.g. an AWS service that wants to access another AWS service)
- IAM Policy: a document containing one or more permissions to grant or deny access to AWS services
Examples:
- A person wants to have access to an AWS service. They first need an IAM Identity. They can create an IAM User for that. Then, they need to attach one or more policies to the IAM User granting access to the appropriate service
- An AWS service, Lambda, wants to have access to another AWS service, CloudWatch, to be able to publish logs. Lambda needs an IAM Identity first. Since only people can use IAM users, the only choice is an IAM Role. Then, Lambda needs a policy to be attached to the role granting access to publish logs to CloudWatch
Lambda
Lambda is the Function As A Service (FaaS) offering from AWS. It’s a serverless computing offering that lets you run almost any type of code without the need to provision or maintain a server. Lambda is one of the most popular services on AWS and can be hooked up to more than 200 AWS services (including S3, SQS, SNS, and API Gateway) to build a cloud application. Lambda supports several runtimes (languages), including Python, Nodejs, and Go. You can find the full list here.
As Lambda is serverless and there’s no server running at all times, we only pay what we use. For instance, if our code takes 2 seconds to run, we (roughly) only pay for 2 seconds. In a traditional approach, a server would be running 24/7 whether or not it was handling any request or workload.
Lambda is great, but nothing is perfect. There are a few limitations with Lambda:
- The maximum timeout for the code to run as a Lambda function is 15 minutes. If your code takes more than that to finish, you can’t use a Lambda function
- The deployment package (application code + all the dependencies) cannot be over 50MB in a
.zipformat, and 250MB in an unzipped format. For instance, if you wanted to train a machine learning model, you probably wouldn’t be able to do that with a Lambda function. Aside from the fact that most trainings need more than 15 minutes (first limitation), it is very possible that your code plus the libraries you’re using (such as tensorflow, keras, pytorch, etc.) will be over 250MB in size - The maximum memory for a Lambda function is 10GB. If your application is memory intensive and needs more than that, you would be better off with other solutions on AWS, such as AWS Batch
The most common way to create a deployment package for Lambda is through S3. We create a deployment package (.zip format) and upload it to an S3 bucket. Then, we reference the package S3 address when we create a Lambda function.
AWS CLI
AWS CLI is a command-line tool that provides an easy interface to interact with AWS services. You can find the method of installation that matches your operating system here.
AWS Vault
AWS Vault is a command-line tool that provides easy and secure access to AWS credentials in development environments. It’s a handy tool that lets us work easily with the AWS SDK and other tools that require AWS credentials, such as Terraform. You can find the installation instructions here.
Infrastructure as Code
The idea behind infrastructure as code (IaC) is that you write and execute code to define, deploy, update, and destroy your infrastructure. This represents an important shift in mindset in which you treat all aspects of operations as software—even those aspects that represent hardware (e.g., setting up physical servers). In fact, a key insight of DevOps is that you can manage almost everything in code, including servers, databases, networks, log files, application configuration, documentation, automated tests, deployment processes, and so on.
There are many advantages in using an IaC tool:
- It’s repeatable and reusable
- It’s easily reversible
- It can be version-controlled
- It can be reviewed and discussed
- It can be automated
- It’s a form of documentation out of the box
Popular IaC Tools
| Pulumi | CloudFormation | Heat | Terraform | |
|---|---|---|---|---|
| Source | Open | Closed | Open | Open |
| Cloud | All | AWS | All | All |
| Type | Provisioning | Provisioning | Provisioning | Provisioning |
| Infra | Immutable | Immutable | Immutable | Immutable |
| Paradigm | Declarative | Declarative | Declarative | Declarative |
| Master | No | No | No | No |
| Agent | No | No | No | No |
| Paid Service | Must-have | N/A | N/A | Optional |
| Community | Small | Small | Small | Huge |
| Maturity | Low | Medium | Low | Medium |
Terraform
Terraform is an open-source Infrastructure As Code (IaC) tool that “enables you to safely and predictably create, change, and improve infrastructure”. Currently, Terraform is the industry-standard tool when it comes to Infrastructure as Code.
You can install Terraform on all major operating systems for free. Follow the instructions for your operating system here.
Terraform code is written in the HashiCorp Configuration Language (HCL) in files with the extension .tf. It is a declarative language, so your goal is to describe the infrastructure you want, and Terraform will figure out how to create it.
Most of the time, we create resource with Terraform. Here’s the syntax:
resource "<PROVIDER>_<TYPE>" "<NAME>" {
  [CONFIG ...]
}
Where the PROVIDER is the plugin you’re using (such as, aws); TYPE is the type of resource you want to create (such as, s3_bucket); NAME is the local name you give to the resource; and CONFIG is the arguments specific to the resource. Here’s an example of creating an S3 bucket:
# create S3 bucket named "test12345678"
resource "aws_s3_bucket" "site_bucket" {
  bucket = "test12345678"
}
Terraform needs to have access to your AWS credentials. There are several ways to do this. The most common ones are:
Having your credentials as environment variables:
export AWS_ACCESS_KEY_ID=xxxxxxx
export AWS_SECRET_ACCESS_KEY=xxxxxx
Note that this approach only works in your current shell. If you open up a new shell, they’ll be gone.
Using AWS Vault
Another way is to use aws-vault which you installed in the previous step.
aws-vault exec <your-aws-vault-profile> -- terraform apply
Useful Terraform Commands
# see the Terraform version
terraform --version

# initialize a provider or module
# you need to run this every time you add a new provider or module
terraform init

# format code
terraform fmt -recursive .

# validate
# this command will check if the syntax is correct
terraform validate

# plan (what will happen if you apply the code)
# this command will not add/remove/alter any resources
# it's just for you to see what WILL happen if you apply the code
terraform plan

# apply
# this will APPLY the code and potentially alter your infrastructure
# Terraform will prompt you once more by default
terraform apply

# destroy
# this command will destroy all the resources created by Terraform
# in the current configuration files
terraform destroy

# show the list of resources created by Terraform
terraform state list

# show all the outputs
terraform output
Create a Lambda Function with Terraform
As we discussed above, we’re going to need an S3 bucket to host our Lambda deployment package. Let’s create a bucket with Terraform.
Create an S3 Bucket
First, we need to set up the terraform block and specify the provider (in this case, AWS). We then specify the region we want to build the infrastructure in.
main.tf
terraform {
  required_providers {
    aws = {
      version = ">= 4.0.0"
      source = "hashicorp/aws"
    }
  }
}

# specify the provider region
provider "aws" {
  region = "ca-central-1"
}
Now, we need to initialize Terraform, since we added a provider:
terraform init
Terraform will install the AWS plugin as part of the initialization.
Now, we can create our S3 bucket. In the same main.tf file, add:
# S3 bucket
# if you omit the name, Terraform will assign a random name to it
# see the docs: https://registry.terraform.io/providers/hashicorp/aws/latest/docs/resources/s3_bucket
resource "aws_s3_bucket" "lambda" {}

# output the name of the bucket after creation
output "bucket_name" {
  value = aws_s3_bucket.lambda.bucket
}
We can now do aws-vault exec <profile-name> -- terraform plan and then aws-vault exec <profile-name> -- terraform apply to create the bucket. We should be able to see our bucket in the S3 console. If you omitted the bucket name like in the above example, you should see a bucket with a name that starts with terraform.
Application Code
We’re going to write very simple Python code as this tutorial is not about Python, but rather, about how to run your code as a Lambda function on AWS. Here’s our sophisticated code:
main.py
# the Lambda runtime call a function in our code
# we can name the function anything we want, but it's a best practice
# to include the word "handler".
#
# the function also needs to accept two positional arguments: event and context.
# the Lambda runtime will pass these two arguments when it runs our code.
# we're not doing anything with them here, but they're necessary anyway.
def handler(event, context):
    print("Hello, Lambda!")
Now, we need to package our code and put it in our S3 bucket we created in the previous step. Here’s how we can package our code as a .zip file using the zip tool on Unix-based systems:
# this will zip the `main.py` file and name it `artifact.zip`
zip artifact.zip main.py
In case our function has dependencies (external libraries), we need to add them to the deployment package as well. Assuming all the external libraries are listed in the requirements.txt file, here’s how we can package them along with the application code:
# we create a new folder named "package" and install the dependecies there.
# we then add our application code (files with the ".py" extension) to the
# zip file
mkdir ./package && pip install -r requirements.txt -t ./package
cd package && zip -r9 ../artifact.zip .
cd ../ && zip -g artifact.zip *.py
We can now push it to our S3 bucket using the AWS CLI:
aws s3 cp artifact.zip s3://<name-of-the-bucket>/hello-world/artifact.zip --profile <your-aws-cli-profile>
Create a Lambda Function
Now that the artifact is in S3, we can continue our Terraform code to create our Lambda function. In the same main.tf file, add the following:
main.tf
# the locals block is used to declare constants that
# you can use throughout your code
locals {
  function_name = "hello-world"
  handler_name  = "main.handler"
  artifact_name = "${local.function_name}/artifact.zip"
}

# create a role for the Lambda function to assume
# every service on AWS that wants to call other AWS services should first assume a role.
# then any policy attached to the role will give permissions
# to the service so it can interact with other AWS services
# see the docs: https://registry.terraform.io/providers/hashicorp/aws/latest/docs/resources/iam_role
resource "aws_iam_role" "lambda" {
  name               = "iam-for-lambda-${local.function_name}"
  assume_role_policy = <<EOF
{
  "Version": "2012-10-17",
  "Statement": [
    {
      "Action": "sts:AssumeRole",
      "Principal": {
        "Service": "lambda.amazonaws.com"
      },
      "Effect": "Allow",
      "Sid": ""
    }
  ]
}
EOF
}

# create a Lambda function
# see the docs: https://registry.terraform.io/providers/hashicorp/aws/latest/docs/resources/lambda_function
resource "aws_lambda_function" "lambda" {
  s3_bucket     = aws_s3_bucket.lambda.bucket
  s3_key        = local.artifact_name
  role          = aws_iam_role.lambda.arn
  function_name = local.function_name
  handler       = local.handler_name

  # see all available runtimes here: https://docs.aws.amazon.com/lambda/latest/dg/API_CreateFunction.html#SSS-CreateFunction-request-Runtime
  runtime = "python3.9"
}

# create a policy for publishing logs to CloudWatch
# see the docs: https://registry.terraform.io/providers/hashicorp/aws/latest/docs/resources/iam_policy
resource "aws_iam_policy" "logs" {
  name        = "lambda-logging-${local.function_name}"
  description = "IAM policy for logging from a lambda"

  policy = <<EOF
{
  "Version": "2012-10-17",
  "Statement": [
    {
      "Action": [
        "logs:CreateLogGroup",
        "logs:CreateLogStream",
        "logs:PutLogEvents"
      ],
      "Resource": "arn:aws:logs:*:*:*",
      "Effect": "Allow"
    }
  ]
}
EOF
}

# attach the above policy to the function role
# see the docs: https://registry.terraform.io/providers/hashicorp/aws/latest/docs/resources/iam_role_policy_attachment
resource "aws_iam_role_policy_attachment" "lambda_logs" {
  role       = aws_iam_role.lambda.name
  policy_arn = aws_iam_policy.logs.arn
}
Run aws-vault exec <profile-name> --no-session -- terraform apply to create the Lambda function. You can now head to the Lambda console and test your function. Note the --no-session in the command. This is because AWS doesn’t allow creating IAM roles with an assumed role, which is basically what AWS Vault does in the background.
Here’s the final Terraform file:
Cleaning Up
Note that this infrastructure doesn’t cost you anything if you don’t invoke your Lambda function many many times as the AWS Lambda free tier includes one million free requests per month and 400,000 GB-seconds of compute time per month. But if you want to delete all the resources you created, here’s how you can do it:
Empty the Bucket
Terraform will not delete your S3 bucket as long as it contains some stuff (in this case, the artifact.zip file). So, you need to empty your bucket first. You can do that using the AWS CLI:
aws s3 rm --recursive s3://<bucket-name> --profile <profile-name>
Now, Terraform can delete all the resources you created with it. Simply run:
aws-vault exec <profile-name> -- terraform destroy
When prompted, answer yes and Terraform will delete everything for you.