Gatsby on AWS: Creating a CI/CD Pipeline
Gatsby is a super-fast static website generator that’s been getting a lot of attention lately. For one, this very website was (proudly) made with Gatsby. If you’re not familiar with it, I encourage you to definitely check it out; spoiler alert: it’s awesome. For one, it uses React which we love! (By the way, React website itself was made with Gatsby)
This post is not about how to build Gatsby websites; rather, it’s on how you can create a CI/CD pipeline and deploy your Gatsby website on AWS. There are 4 easy steps to achieve this:
- Preparing an S3 bucket to host your static website
- Creating a
buildspec.ymlfile to instruct AWS where and how to deploy your website - Pushing your code to GitHub
- Creating an AWS CodePipeline to build and deploy your website whenever you push a new commit to your repository
Preparing an S3 bucket for hosting a static website
I’ve talked about this extensively in another post. Check it out here.
Creating a build file
For your CI/CD pipeline to work, you need to provide AWS CodeBuild with a file named buildspec.yml. Although it’s possible to name it something else, it’s always good practice to stay with the default name. The file will reside in the root directory of your Gatsby site. Let’s create the file and put the following in it:
version: 0.2
phases:
  install:
    runtime-versions:
      nodejs: latest
    commands:
      - echo installing npm packages
      - npm install
  build:
    commands:
      - echo build started
      - npm run build

  post_build:
    commands:
      - echo post_build started
      - aws s3 sync public/ $BUCKET --exclude "*.map" --acl public-read --delete
We have three phases here. The first one is install where you, well obviously, install all the dependencies your Gatsby website is using. We can simply achieve this by running npm install. Note that all the commands we include in the buildspec.yml file will be executed by the root user unless specified otherwise.
For runtime-versions, I chose version 10 of nodejs. You can find the whole list of supported versions here.
The next phase is build. Here we simply build our Gatsby website by running npm run build. This command will build your project and output the files in the /public folder. In the next step, we sync the contents of this folder with our S3 bucket on AWS.
The post_build phase, as the name suggests, happens after your website is sitting in the /public folder and ready to be deployed (copied to our S3 bucket). The command we want to execute here is aws s3 sync public/ $BUCKET --exclude "*.map" --acl public-read --delete. This command will sync your /public folder with your S3 bucket ($BUCKET), delete all the .map files (this is optional and you may want to have them in production as well; I just don’t), make every file publicly accessible by using --acl public-read, and finally delete any file that doesn’t currently exist in your /public folder (when you delete a file in your new version, for instance, but the file still resides in your bucket). Note that we didn’t put the exact name of our S3 bucket. Rather, we used an environment variable so that people can’t see what the actual name is. Remember that in this example, we are going to push our website into a public repository on GitHub, so people can see our files. In the next step, we will create this environment variable while creating a CodeBuild project.
Pushing the code to GitHub
This step is beyond the scope of this tutorial but I’m sure you know how to do it. Go ahead and create a public repository on GitHub and push your website. Remember to stage and commit all the changes (including the changes we made to the buildspec.yml file) first.
Creating a CI/CD pipeline with AWS CodePipeline
CodePipeline is the AWS CI/CD service that encompasses all the different stages in your project. It can have many stages (source, build, test, deploy, etc.) but here we only need two: source and build. Note that our build process will also take care of the deployment which is but a simple command.
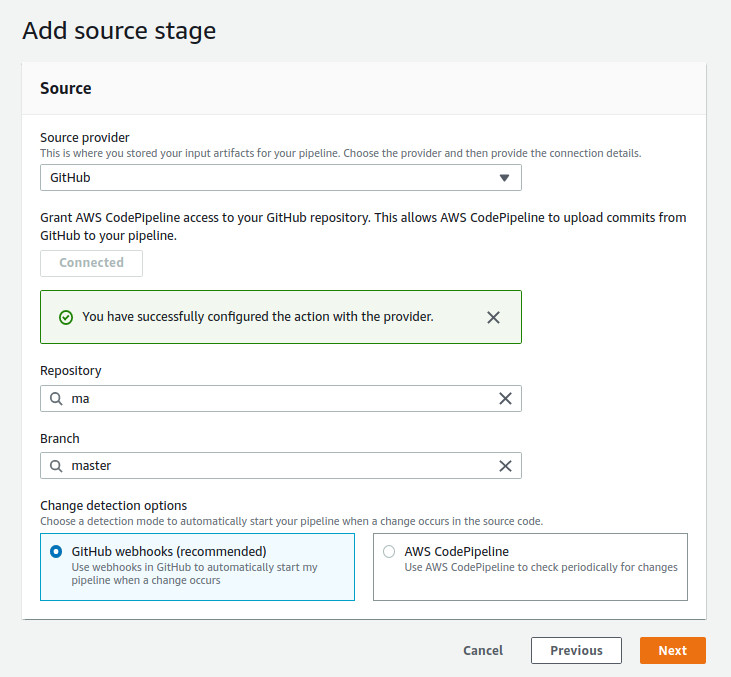
For creating a pipeline, head over to the CodePipeline console and click on Create Pipeline. Give the pipeline an appropriate name and let AWS create a new service role for your pipeline. This role will allow your pipeline to access different services, like CodeBuild, to function properly. Click Next to go to the Source stage. Here, select GitHub as the Source Provider and click on Connect to GitHub button. A new window will pop up where you have to enter your GitHub credentials to make the connection. Select the repository your website is sitting in and the branch you want to deploy (probably the master branch). Leave GitHub webhooks selected for change detection. Your final settings should look like this:
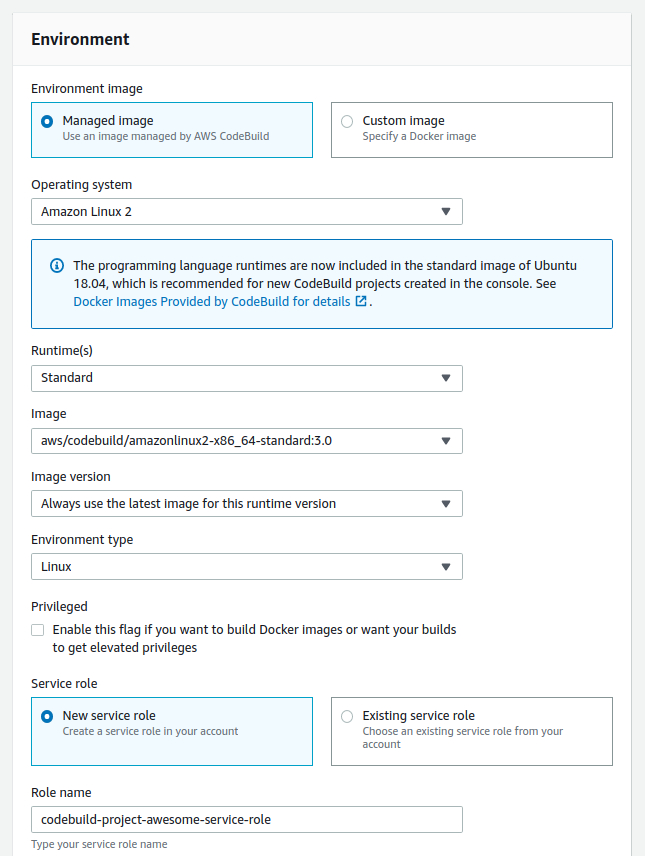
Click Next to go to the next stage: Build. Select AWS CodeBuild as Build Provider, select the region you’d like to create your build project in, and click on Create Project. It will pop up a new window for you where you will configure your build. Give your project a name first. Under Environment, leave Manged image selected as Environment image and select Amazon Linux 2 as Operating System (you can also use Ubuntu). For Runtime(s), select Standard (which is the only option, by the way) and for Image, select the most recent version of x86_64-standard, which currently is 3.0. Leave New service role selected and enter a Role name (I usually precede the name with build but at the end of the day, it doesn’t really matter).
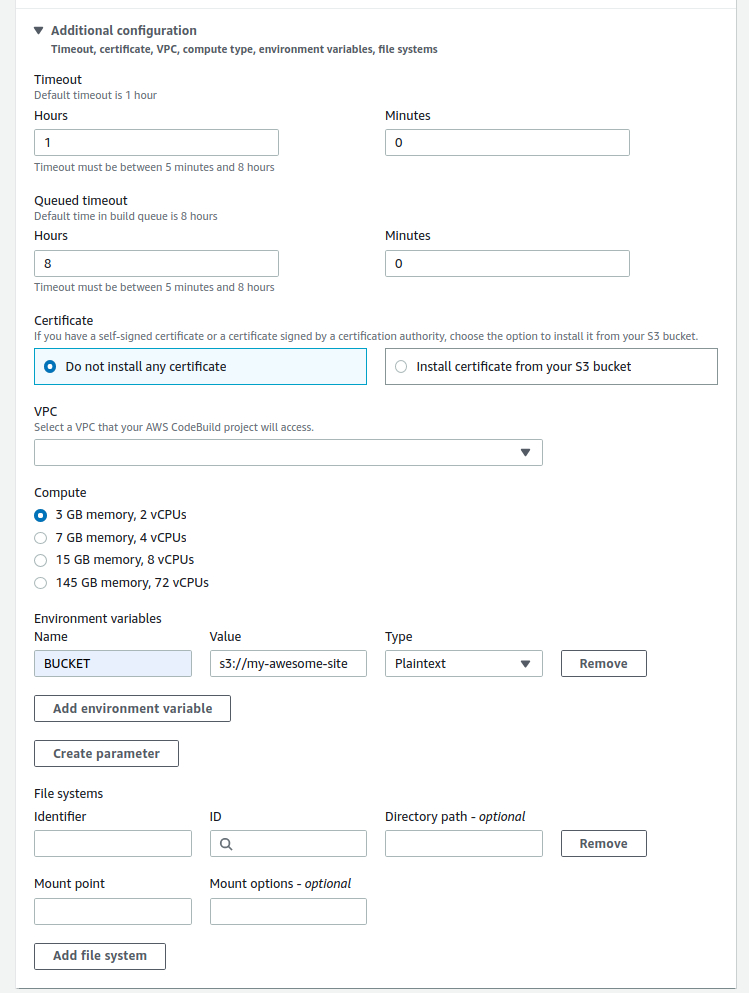
The last thing that we want to change is under Additional configuration. Click on the title to expand it. Near the bottom, you’ll find Environment variables. Put $BUCKET for Name and then for value, put the name of your S3 bucket you want to put your website in. It’s important to remember that you have to precede the name with s3://. So, for instance, if your bucket name is my-awesome-website, you should put s3://my-awesome-website for value. And that’s it. Leave everything as it is and click on Continue to CodePipeline button at the very bottom of the window.
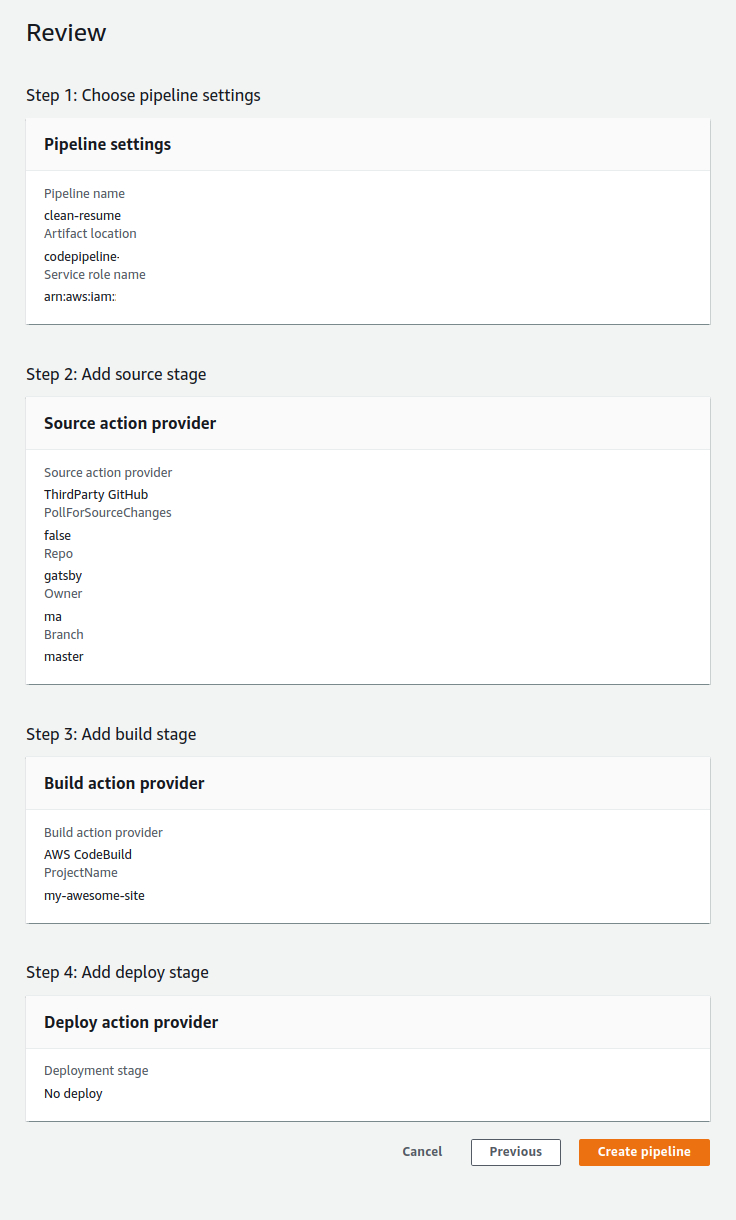
Click Next to go to the next stage: Deploy. We don’t really need this stage, so click on Skip deploy stage and confirm. You will be presented with the Review page where you can see an overview of your pipeline (see picture below). Click on Create pipeline.
After creating your pipeline, you will be directed to the pipeline page where you can see your two stages (Sorce and Build). Note that the pipeline will run automatically at this point. The Source stage will pull up your code from GitHub, put it in an S3 bucket (not your destination bucket, though). Then Build will grab the code from that bucket and starts building. It does so by reading the buildspec.yml file we put in the root folder of our project. While running, you can click on Details inside the Build stage to see what’s going on. One of the cool tabs to watch is the Phase details tab where you can see all the phases that your build is going through one at a time.
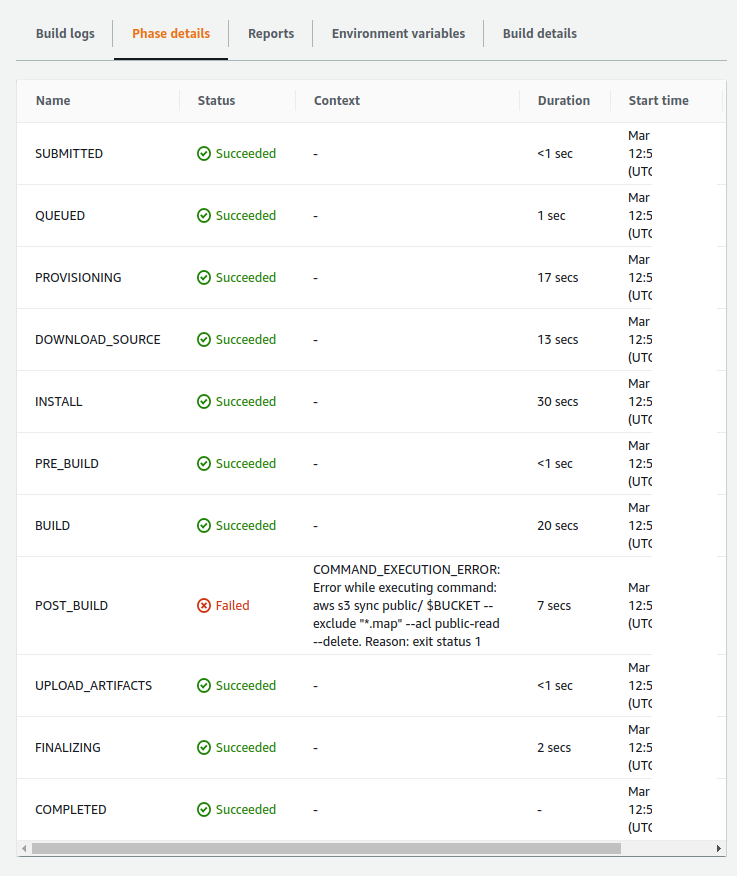
As you can see in the picture above, the build failed! The reason is that AWS services do not trust each other and if a service needs to access another, we should give it the necessary permissions explicitly. So, what AWS service our build doesn’t have access to exactly? Let’s review the whole process from beginning to end:
- We create an S3 bucket and configure it so that it can serve a static website
- We connect the Source stage with our GitHub account to pull the code
- Source will pull the code from GitHub and create an artifact in another S3 bucket
- Build will grab the artifact from the S3 bucket
- Build will build the project and put the contents of the
/publicfolder in the S3 bucket we configured for our website
Which step do you think the problem is coming from? Besides steps 1 and 2, in the other steps, at least one AWS service tries to access another, so the problem should be in one of these steps. CodePipeline takes care of steps 3 and 4 by creating the role services we saw earlier. The only step that CodePipeline has no idea about is the last one. Although we created an environment variable for our build, nowhere during our configurations did we give the build project enough privileges to access the website bucket. Thus, Build does not have access to this bucket. So, how to fix this? Enter IAM.
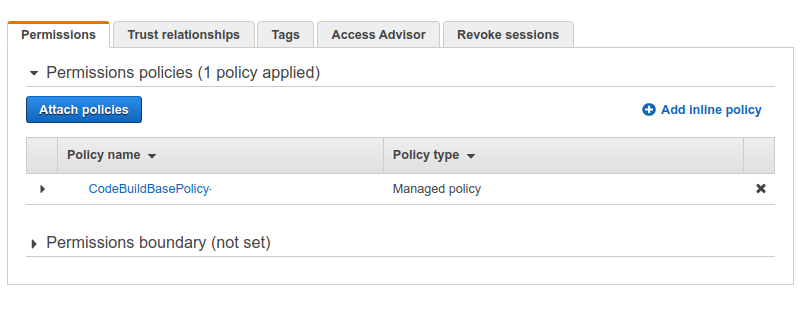
IAM or Identity and Access Management is the AWS service responsible for, well, managing access. Go to the IAM console, select Roles from the left pane, and find the role you gave to your build project. Click on it and you’ll be presented with all the permissions this service currently possesses. As you can see in the picture below, there’s only one policy currently associated with this service and that’s what we gave it during its configuration.
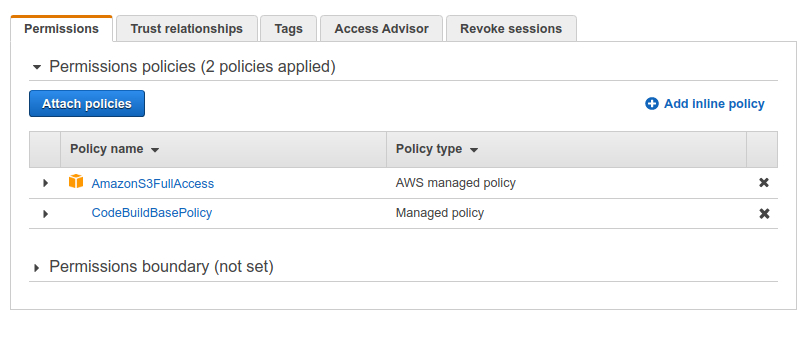
This is not enough; we need to have another policy to access our website bucket. To do so, click on Attach policies and search for S3. From the results list, select AmazonS3FullAccess by checking the checkbox on its left and then click on Attach policy at the bottom of the page. And that’s it. Our build project has now the necessary privileges and it should look like this:
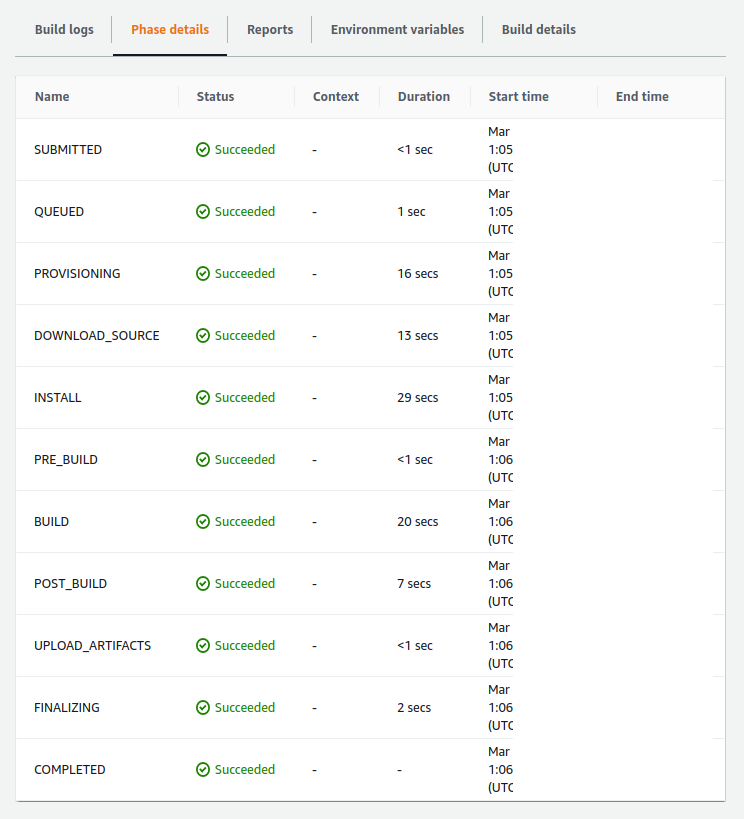
You can now head back to the CodePipeline console, select your pipeline, and then click on Release change for running the pipeline once more. This time, it should go through all the stages and deploy your website. You build phases should now look like this, with all the phases looking green:
Now, you can head to the S3 console, click on your bucket name, then Properties, then Static website hosting, and from there on your website Endpoint to see your Gatsby website online. Perfect!
In the end, I just want to point out that the policy we gave to our build project (AmazonS3FullAccess) was a bit much in that now our build can read and write to and from all the S3 buckets we have. But the truth is, it only needs to access one bucket (our website bucket). Although IAM allows you to give very fine-grained access levels to your services and users, it’s a little out of the scope of this tutorial to go into the details of how we can do that. It’s not that we’re currently at huge risk or anything, but I just wanted to say that it’d be better to follow the Least Privileges Principal and don’t give too much access to any service or human being. You can definitely Google how to do that and I strongly encourage you to do so. I might write a post about it in the future. But for now, I think we’re good.